Countersunk rivets are essential fasteners in many industries, from aerospace and automotive to construction and DIY projects. Unlike standard rivets, countersunk rivets are designed to sit flush with the material surface, providing a smooth, finished look. But to ensure they work properly, accurate measurement is crucial. If the rivet is too long, too short, or the angle doesn’t match, it can compromise the joint’s strength and appearance. In this guide, we’ll break down the key steps to measure a countersunk rivet correctly.
What Is a Countersunk Rivet?
Before diving into measurements, let’s quickly understand what a countersunk rivet is. A countersunk rivet has a flat head that tapers into a conical shape, allowing it to sit flush with the surface once installed. This makes it ideal for applications where a smooth surface is necessary, such as airplane panels, furniture, or electronics.
Unlike dome-head rivets, which protrude above the material, countersunk rivets blend in seamlessly. But this also means measuring them correctly is more critical because even a small mismatch in size or angle can affect both function and aesthetics.
Key Measurements You Need
When measuring a countersunk rivet, there are four main dimensions to check:
-
Shank Diameter
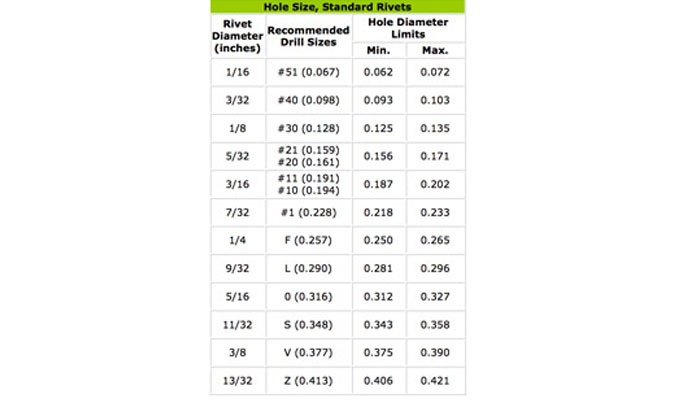
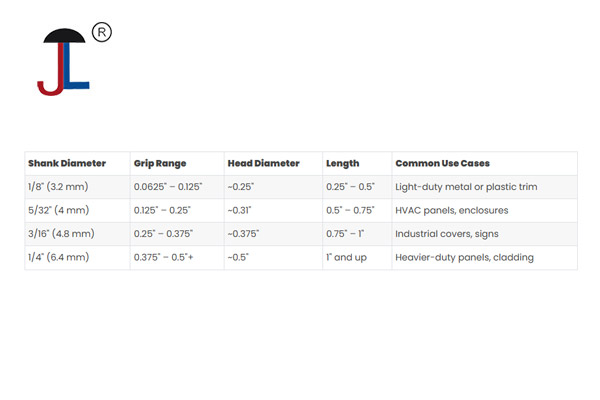
The shank is the long cylindrical part of the rivet that goes through the materials you’re joining. Measure the diameter of the shank with a caliper or micrometer. This ensures it fits snugly into the pre-drilled hole without being too loose or forcing the material. -
Rivet Length
Rivet length is measured from the bottom of the head to the tip of the shank. This length must match the combined thickness of the materials you’re fastening. A rivet that is too short won’t hold properly, and one that’s too long may deform the material or leave extra material sticking out. -
Head Diameter
The head diameter is the widest part of the countersunk head. This measurement is important to ensure the rivet sits correctly in the countersunk hole without leaving gaps or protruding. Use a caliper to measure across the head’s widest point. -
Countersink Angle
The countersink angle is the angle of the head taper, usually ranging from 60° to 120°. Common standard angles are 82°, 90°, and 100°. Measure this angle using a protractor or an angle gauge. Matching the countersink angle with the hole ensures a flush fit.
Step-by-Step Guide to Measuring
Here’s a simple step-by-step method to measure a countersunk rivet:
-
Gather Your Tools
You’ll need a digital caliper, a micrometer (optional for higher precision), and an angle gauge or protractor. -
Measure the Shank Diameter
Place the caliper around the cylindrical shank and read the diameter. Record the measurement carefully. -
Measure the Length
Measure from the bottom of the head to the tip of the rivet. Make sure the rivet is straight when measuring to avoid errors. -
Measure the Head Diameter
Position the caliper across the widest part of the head. This is usually at the top of the taper, where it meets the surface when installed. -
Check the Countersink Angle
If you have a protractor, align it with the conical surface of the head to read the angle. For more accuracy, use a countersink gauge designed for rivets.
Tips for Accurate Measurement
- Use Proper Tools: Digital calipers and micrometers give the most precise measurements. Avoid rulers for critical applications.
- Measure Multiple Rivets: Sometimes manufacturing tolerances vary slightly. Measuring a few rivets ensures you get an average size.
- Check the Countersunk Hole: Make sure the hole in your material matches the rivet’s angle and diameter. A proper fit is as important as the rivet itself.
- Consider Material Thickness: Always select a rivet length slightly longer than the total thickness of the materials to allow proper deformation during installation.
Why Accurate Measurement Matters
Using the wrong rivet size or angle can lead to:
- Weak joints that may fail under stress
- Protruding heads that affect aesthetics
- Material damage from over-compression or improper seating
- Misalignment in assembly, which is critical in precision applications like aviation or electronics
Accurate measurement prevents these issues, ensuring your project is both functional and professional-looking.
Conclusion
Measuring a countersunk rivet may seem simple, but precision matters. Always check the shank diameter, rivet length, head diameter, and countersink angle before installation. With the right tools and careful measurement, you can ensure a perfect, flush fit every time.
For those who need custom solutions, many suppliers offer customized countersunk rivets tailored to specific lengths, diameters, and angles. This is especially useful for specialized projects where standard sizes don’t meet your requirements.
Accurate measurement is the first step to strong, reliable, and visually appealing assemblies. Whether you’re a DIY enthusiast or a professional engineer, mastering rivet measurement will save time, reduce errors, and improve results.